Are you looking to install loft insulation in your UK home this year? Doing it yourself can save a significant amount on labour costs, but getting the method right is essential for the insulation to work effectively.
This guide explains the two main options for loft insulation in 2026: doing it yourself with mineral wool rolls, or hiring a professional to install blown-fibre insulation. The best choice depends on your budget, your loft’s accessibility, and whether you want to handle the work yourself.
Installing loft insulation yourself can save hundreds of pounds, but the method depends on your loft type
The two main options for insulating your loft are DIY blanket insulation using mineral wool rolls, and professional blown-fibre insulation. DIY blanket insulation costs roughly £300–£500 for a typical three-bedroom semi-detached house (Energy Saving Trust, 2026). Professional blown-fibre insulation costs £500–£1,000 for the same house (Energy Saving Trust, 2026).
DIY saves on labour costs but requires you to have safe access to the loft, wear protective gear, and fit the material correctly. Professional installation is faster and may qualify for government grants or schemes, though eligibility depends on your property and household circumstances.
The single most important step for loft insulation is sealing every air gap before laying any material
Before you lay any insulation, you must seal all air gaps around pipes, wires, and the loft hatch. Unsealed gaps can reduce the effectiveness of your insulation by up to 30% (Energy Saving Trust, 2026).
Use expanding foam or caulk for gaps up to 10mm wide. For larger holes, cut a piece of rigid foam board to size and fix it in place. This step prevents warm, moist air from the living spaces below reaching the loft. If you skip it, moisture can condense on the cold roof structure, leading to mould and timber rot.
Pay special attention to the area where the loft hatch sits. A poorly sealed hatch is a major source of heat loss. loft hatch insulation guide
You must choose between mineral wool rolls and blown fibre, here are the U-values and costs side by side
Mineral wool rolls, which you install yourself, achieve a U-value of 0.16 W/m²K when laid at a depth of 270mm. The material cost is roughly £4–£6 per square metre (DESNZ, 2026). A U-value measures how quickly heat passes through a material; a lower number means better insulation.
Professional blown-fibre insulation achieves a U-value of 0.15 W/m²K at a depth of 300mm. The installed cost is roughly £8–£12 per square metre (Energy Saving Trust, 2026). Both options meet the current Building Regulations requirement of a U-value no higher than 0.16 W/m²K for loft insulation in new builds or retrofit work (GOV.UK, 2026).
Your choice depends on whether you want to do the work yourself and your budget for materials versus professional labour.
Quick numbers, cost, depth, and annual savings for DIY vs professional loft insulation
| Metric | DIY mineral wool rolls | Professional blown fibre |
|---|---|---|
| Total cost (3-bed semi) | £300–£500 | £500–£1,000 |
| Recommended depth (mm) | 270 mm | 300 mm |
| Annual energy saving | £180–£250 | £200–£280 |
| Payback period (years) | 1.5–2.5 years | 2–4 years |
| U-value achieved (W/m²K) | 0.16 | 0.15 |
All figures from Energy Saving Trust, 2026. Annual savings depend on your current insulation level, house size, and energy tariff.
Step-by-step for DIY mineral wool rolls, prepare, lay, and finish without compressing the material
Follow these four steps if you choose to install mineral wool rolls yourself.
Step 1: Clear the loft of all stored items. Check for any existing insulation. If it is damp, mouldy, or contaminated, remove it before starting. Do not lay new insulation over damp material.
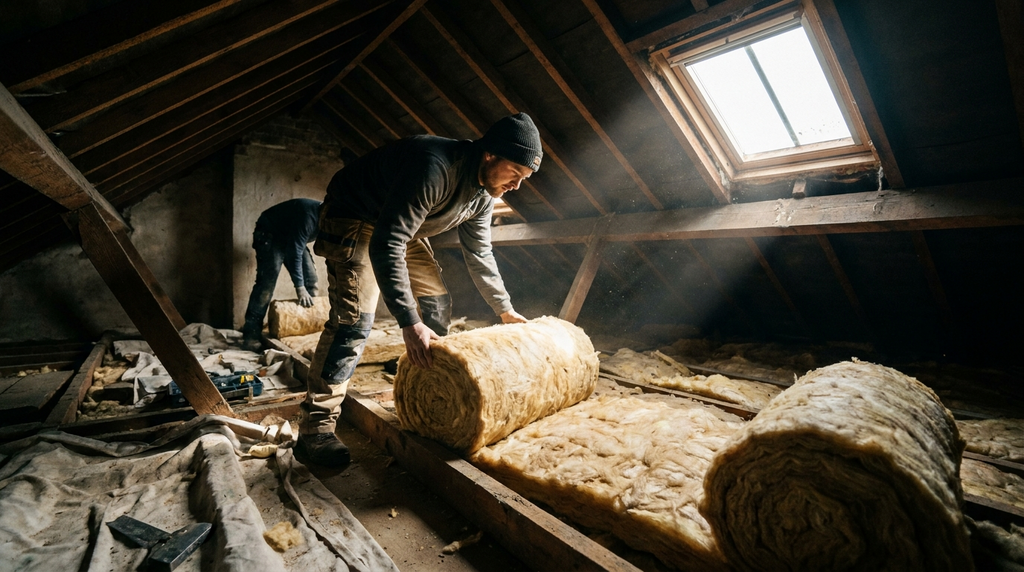
Step 2: Lay the first layer of mineral wool between the joists. Cut the rolls to fit snugly against each other and against the walls. Do not compress the material. Compression reduces the U-value by up to 20% for every 10% of compression (BRE, 2026).
Step 3: Lay the second layer across the joists, running perpendicular to the first layer. This covers the wooden joists, which act as thermal bridges that let heat escape.
Step 4: Do not insulate directly under the roof slope if the loft is unheated. Leave a 50mm ventilation gap at the eaves to allow air to flow through the loft space (GOV.UK, 2026). Blocking this gap can cause condensation and rot.
how to insulate a loft with no loft hatch access
Step-by-step for professional blown-fibre insulation, what the installer does and what you need to check
If you hire a professional for blown-fibre insulation, the installer will use a machine to blow cellulose or mineral fibre to a uniform depth, typically 300mm, across the entire loft floor.
Before work starts, you must ensure the installer holds MCS certification for blown-fibre insulation (MCS, 2026). The installer should seal any air gaps and fit a loft hatch insulation cover as part of the service. Confirm this in writing before you agree to the work.
After installation, the material should be level and evenly spread. Walk away from the loft until the fibre has settled for 24 hours if possible, as walking on fresh blown fibre can create uneven patches.
How to verify your installer, MCS certification, TrustMark, and what to check on the register
For blown-fibre insulation, the installer must be MCS-certified (MCS, 2026). You can search the MCS register online to confirm their certification is current.
Check that the installer is also registered with TrustMark, which provides additional consumer protection and a route for complaints (TrustMark, 2026).
For DIY mineral wool installation, no certification is needed. However, you must follow the manufacturer’s instructions for the correct depth and for leaving ventilation gaps at the eaves.
Always get a written quote before work begins. The quote should state the target U-value and the depth of insulation to be installed. This gives you a clear record if the work does not meet the agreed standard.
Frequently Asked Questions
First, seal all air gaps with expanding foam or caulk. Then lay mineral wool rolls between and over joists to a depth of 270mm (Energy Saving Trust, 2026). Wear protective gloves, a mask, and long sleeves to avoid irritation.
DIY mineral wool costs £300-£500 for a 3-bed semi. Professional blown-fibre costs £500-£1,000 (Energy Saving Trust, 2026). Grants may reduce costs for eligible households under ECO4.
Yes, DIY blanket insulation is straightforward with mineral wool rolls. You need safe loft access, protective gear, and to follow the correct method. Professional blown-fibre is faster but costs more.
The recommended depth for mineral wool loft insulation is 270mm (Energy Saving Trust, 2026). This meets current building regulations and provides optimal thermal performance.
Yes, sealing air gaps is the most important step. Unsealed gaps can reduce insulation effectiveness by up to 30% (Energy Saving Trust, 2026). Use expanding foam for gaps up to 10mm wide.